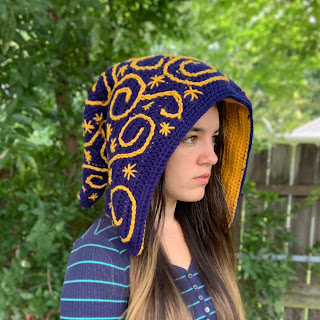
Free Crochet Wizard Hood Pattern
This is the easiest best quality free crochet pattern for a wizard hood you will find on the internet. Okay fine in my opinion it is haha! For a quick break down of this pattern it is worked in 4 separate pieces. The main part of the hat, the liner, the point of the hat and the embroidery. If you’d rather have a video break down of the pattern I also have a YouTube tutorial as well. If you use this pattern and decide to sell it I only require that you mention you used my pattern. With all that mentioned let’s get started.
LINK
Materials
- One skien of Red Heart Super Saver Jumbo Soft Navy
- One skien of Res Heart Super Saver Saffron
- Darning Needle
- I crochet hook
Abbreviations
SLST - slip stitch
CH - chain
HDC - half double crochet
RND - round
Main Part
Using Soft Navy
Row 1 - CH 91, HDC in second chain from hook, HDC in each stitch across, CH 1, turn, [90]
Row 2-23 - HDC in each stitch across, CH 1, turn [90]
Row 24 - HDC in each stitch across, CH 1, fasten off, [90]
Liner
Using Saffron
Row 1 - CH 91, HDC in second chain from hook, HDC in each stitch across, CH 1, turn, [90]
Row 2-22 - HDC in each stitch across, CH 1, turn [90]
Row 23 - HDC in each stitch across, CH 1, fasten off, [90]
Point of Hat
Using Soft Navy
Rnd 1: chain 3, make 8 dc in the 3rd ch from the hook, join in the round [8]
Rnd 2: CH 1, *2 HDC, HDC in next stitch*, join [12]
Rnd 3: CH 1, HDC in each stitch, join [12]
Rnd 4: CH 1, *2 HDC, HDC in next 2 stitches*, join [16]
Rnd 5: CH 1, HDC in each stitch, join [16]
Rnd 6: CH 1, *2 HDC, HDC in next 3 stitches*, join [20]
Rnd 7: CH 1, HDC in each stitch, join [20]
Rnd 8: CH 1, *2 HDC, HDC in next 4 stitches*, join [24]
Rnd 9: CH 1, HDC in each stitch, join [24]
Rnd 10: CH 1, *2 HDC, HDC in next 5 stitches*, join [28]
Rnd 11: CH 1, HDC in each stitch, join [28]
Rnd 12: CH 1, *2 HDC, HDC in next 6 stitches*, join [32]
Rnd 13: CH 1, HDC in each stitch, join [32]
Rnd 14: CH 1, *2 HDC, HDC in next 7 stitches*, join [36]
Rnd 15: CH 1, HDC in each stitch, join [36]
Rnd 16: CH 1, *2 HDC, HDC in next 8 stitches*, join [40]
Rnd 17: CH 1, HDC in each stitch, join [40]
Rnd 18: CH 1, *2 HDC, HDC in next 9 stitches*, join [44]
Rnd 19: CH 1, HDC in each stitch, join [44]
Rnd 20: CH 1, *2 HDC, HDC in next 10 stitches*, join [48]
Rnd 21: CH 1, HDC in each stitch, join [48]
Rnd 22: CH 1, *2 HDC, HDC in next 11 stitches*, join [52]
Rnd 23: CH 1, HDC in each stitch around, join [52]
Attaching and Embroidery
• Fold rectangle in half, sew up one side while leaving a hole big enough for point to be sewn in too.
• Turn point of hood inside out, slst hood to the hole left from rectangle
• Turn hood right side out embroidery stars and swirls on hood
• Turn hood inside out and slst liner to hood.
• Turn hood right side out and you’re done
Ending
If any of this confused you please reference my YouTube video for guidance. This is a KristalCrochet original pattern. Do not claim this as your own. You may share a link to your cite but do not repost my pattern.


Comments
Post a Comment